With the Digital Downloads Pro theme can use styled text for your Site Title and Tagline or upload a logo image of your choice. To configure these options from your WordPress dashboard, click on Appearance > Customize. Open the “Site Identity” menu. Enter your Site Title and Tagline, then click “Save.”

Image Logo
Digital Downloads Pro comes with the option to use an Image Logo file. If you use an Image Logo, your image will be displayed in place of the Site Title and Tagline content.
Click the ‘Select Image‘ button and choose your logo file from the Media Library, then select ‘Show Logo Image‘ from the Site Title Display drop-down.
The maximum size for a logo displayed in the theme is 300px × 100px, and we’ve disabled the forced cropping option to allow for varying logo sizes in the available space.
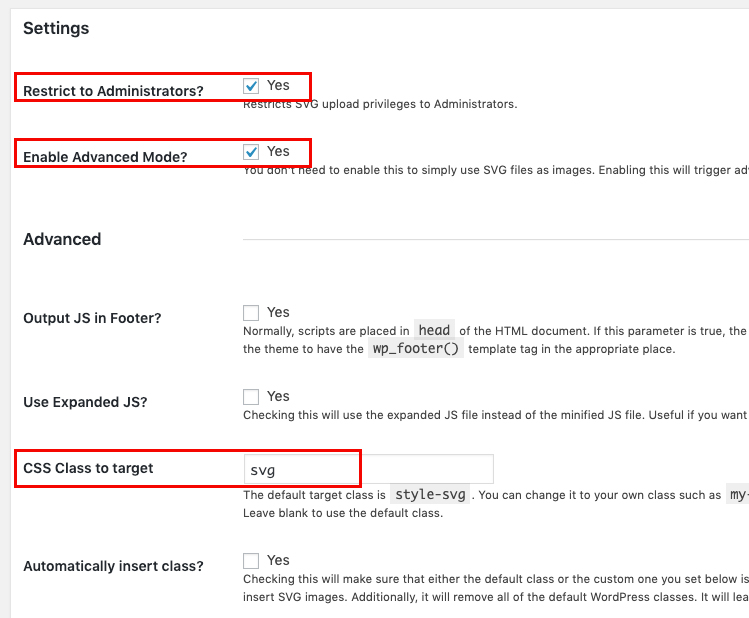
SVG Files
If you have installed the “SVG Support” plugin, you can upload SVG files to use as your logo. Under the Settings for SVG Support, ensure you have “Restrict to Administrators” and “Enable Advanced Mode” settings turned on, and assign the “CSS Class to Target” as: svg.
Color-changing SVG logo on Transparent Header pages
With a little configuration, you can have your SVG logo change color with the header on Transparent Header pages.
On Transparent Header pages, initially, all header items are colored white. When the user scrolls down the page, the header changes to have a solid background color, and all header items use their default assigned colors. By adding a CSS class to elements inside your SVG logo file, you can have your logo change color with the rest of the header items on scroll.

1. Open your SVG logo file in an editor like Inkscape or Adobe Illustrator.
2. Select the shapes you want to change to white (text must be broken up into outlines). Group them and save the SVG file.

3. Open the SVG in a text editor program.
4. Search for a <g> tag with fill=”#xxxxxx”. This is the group you created in Step 2. Keep track of the color assigned here.

5. Remove the fill declaration and replace it with class=”fill-when-transparent”.

This will cause those elements to be filled with black by default, so you will need to define the colors in the theme’s stylesheet.
6. At the end of your style.css file (or in Customizer > Additional CSS), add the following CSS code:
body.custom-logo.transparent-header .site-header:not(.scrolled) .title-area a .svg .fill-when-transparent {
  fill: {YOUR-COLOR-HERE};
}

@media screen and (max-width: 1023px) {
    body.custom-logo.transparent-header .site-header.scrolled .title-area a .svg .fill-when-transparent {
      fill: {YOUR-COLOR-HERE};
    }
}
Replace {YOUR-COLOR-HERE} with the color you removed from Step 4.
7. When you refresh, your SVG file should be white on transparent headers and in color on scroll.